Thursday, June 16, 2022

Getting IP Geolocation Information Using Curl

The tool that we are going to use is just curl. We need to access the url of the website that will provide the geolocation information of the IP address. Let's get to it.


The first provider, is by using ipapi.co. To get the geolocation of an ip from ipapi.co:
$ curl https://ipapi.co/ip-address/json

For example, to get the geolocation information of google dns, we can type:
$ curl https://ipapi.co/8.8.8.8/json

And we should be getting some output like this:
{
    "ip": "8.8.8.8",
    "network": "8.8.8.0/24",
    "version": "IPv4",
    "city": "Mountain View",
    "region": "California",
    "region_code": "CA",
    "country": "US",
    "country_name": "United States",
    "country_code": "US",
    "country_code_iso3": "USA",
    "country_capital": "Washington",
    "country_tld": ".us",
    "continent_code": "NA",
    "in_eu": false,
    "postal": "94043",
    "latitude": 37.42301,
    "longitude": -122.083352,
    "timezone": "America/Los_Angeles",
    "utc_offset": "-0800",
    "country_calling_code": "+1",
    "currency": "USD",
    "currency_name": "Dollar",
    "languages": "en-US,es-US,haw,fr",
    "country_area": 9629091.0,
    "country_population": 327167434,
    "asn": "AS15169",
    "org": "GOOGLE"
}

We can also specify which information we want to be displayed specifically:
$ curl https://ipapi.co/8.8.8.8/country
US

The second provider is ipinfo.io. Similar to the above example, we can just use curl like below to get the geolocation information of a certain ip address:
$ curl https://ipinfo.io/ip-address

For example, to get the information of the ip 8.8.8.8, we can issue this command:
$ curl https://ipinfo.io/8.8.8.8

and we should get output like this
{
  "ip": "8.8.8.8",
  "hostname": "dns.google",
  "anycast": true,
  "city": "Mountain View",
  "region": "California",
  "country": "US",
  "loc": "37.4056,-122.0775",
  "org": "AS15169 Google LLC",
  "postal": "94043",
  "timezone": "America/Los_Angeles",
  "readme": "https://ipinfo.io/missingauth"

Like the above example, we can also specify what information we wan to be shown, by using:
$ curl https://ipinfo.io/8.8.8.8/postal

And we should get something like this:
94043

Saturday, June 4, 2022

Running Mongodb Replication Using Docker

For a proper mongodb replication, we are going to start 3 containers for this exercise.


First, start the first container, we will call it mongorep1. We need to set it so that it has hostname, configured to listen to all interfaces, and set a replSet for it called myrepl
docker run -dit --name mongorep1 --hostname mongorep1 mongo:6 --bind_ip_all --replSet myrepl

Once running, we need to get the ip address of mongorep1
docker inspect mongorep1 | grep -w IPAddress
            "IPAddress": "172.17.0.2",

Then, we will start the second container. We need to feed the ip address of the first container to the second container as hosts so that mongo will not have issue setting up the replication
docker run -dit --name mongorep2 --hostname mongorep2 --add-host mongorep1:172.17.0.2 mongo:6 --bind_ip_all --replSet myrepl

Start the third and final container, with command almost similar to the second container.
docker run -dit --name mongorep3 --hostname mongorep3 --add-host mongorep1:172.17.0.2 mongo:6 --bind_ip_all --replSet myrepl

Once we have all the nodes running, access mongosh on the first container, and initiate replica set
docker exec -it mongorep1 mongosh
test> rs.initiate()

Add the other node into the replicaset
myrepl [direct: secondary] test> rs.add("172.17.0.3")
myrepl [direct: primary] test> rs.add("172.17.0.4")

Check the status of the replica set, make sure the first node is the primary node, and the other 2 are the secondary nodes
myrepl [direct: primary] test> rs.status()

...

  members: [

    {

      _id: 0,

      name: 'mongorep1:27017',

      health: 1,

      state: 1,

      stateStr: 'PRIMARY',

...

    {

      _id: 1,

      name: '172.17.0.3:27017',

      health: 1,

      state: 2,

      stateStr: 'SECONDARY',

...

    {

      _id: 2,

      name: '172.17.0.4:27017',

      health: 1,

      state: 2,

      stateStr: 'SECONDARY',

... 


Check if the other node is lagged in terms of replicating data
myrepl [direct: primary] test> db.printSecondaryReplicationInfo()

source: 172.17.0.3:27017

{

  syncedTo: 'Mon Dec 19 2022 15:48:01 GMT+0000 (Coordinated Universal Time)',

  replLag: '0 secs (0 hrs) behind the primary '

}

---

source: 172.17.0.4:27017

{

  syncedTo: 'Mon Dec 19 2022 15:48:01 GMT+0000 (Coordinated Universal Time)',

  replLag: '0 secs (0 hrs) behind the primary '

}

We can test the replication, by adding data into the first node, and check if the data is being replicated into the second and third node. 
docker exec -it mongorep1 mongosh
myrepl [direct: primary] test> use mynewdb
myrepl [direct: primary] mynewdb> db.people.insertOne( { name: "John Rambo", occupation: "Soldier" } ) 
exit
Now access mongosh in the second node and view the data, The data should be similar to the mongorep1
docker exec -it mongorep2 mongosh
myrepl [direct: secondary] test> show dbs
myrepl [direct: secondary] test> use mynewdb
myrepl [direct: secondary] test> db.people.find()
[
  {
    _id: ObjectId("63a08880e1c97fba6959ec15"),
    name: 'John Rambo',
    occupation: 'Soldier'
  }
]

If you encounter this error:

MongoServerError: not primary and secondaryOk=false - consider using db.getMongo().setReadPref() or readPreference in the connection string

Run below command to enable read on the secondary nodes
myrepl [direct: secondary] test> db.getMongo().setReadPref("secondary")

Do the same for the third node, the data should also be the same.

docker exec -it mongorep3 mongosh
myrepl [direct: secondary] test> use mynewdb
myrepl [direct: secondary] test> db.people.find() 
[
  {
    _id: ObjectId("63a08880e1c97fba6959ec15"),
    name: 'John Rambo',
    occupation: 'Soldier'
  }
]

Friday, May 27, 2022

Excellent pdf editor in ubuntu

One of the field that I found linux is quite lacking is, in editing pdf. But a few weeks ago, A friend of mine recommended an excellent tool, called xournal++ (or xournalpp). This is actually a tool to do journalling, but the pdf editing feature is so good, it beats all the tools I previously used.


This application is available not just in Linux, but in Windows and MacOS as well. To install xournal++ in ubuntu, just follow the steps below.

Installing using snap

First, make sure you have snapd installed. If you do not have snap, you can install it by running
$ sudo apt install snapd -y

Then, install xournal++ using snap
$ sudo snap install xournalpp

Installing using apt (for ubuntu 22.04 and above)

If you are not a fan of snap, worry not, xournal++ is also available in the ubuntu repository for ubuntu 22.04 and above. Please folllow below steps to install xournalpp using apt.

Install xournalpp
$ sudo apt install xournalpp -y

Installing using apt (for older ubuntu)

Lets say your are using an older version of ubuntu (for example 20.04), worry not, just download the deb package from the release page, and install it using apt.

Browse the release page at https://github.com/xournalpp/xournalpp/releases/. 


Click on the "Tags" tab, and choose which release that you are interested. In this example we will choose v1.1.3. Click on the v1.1.3 tag.

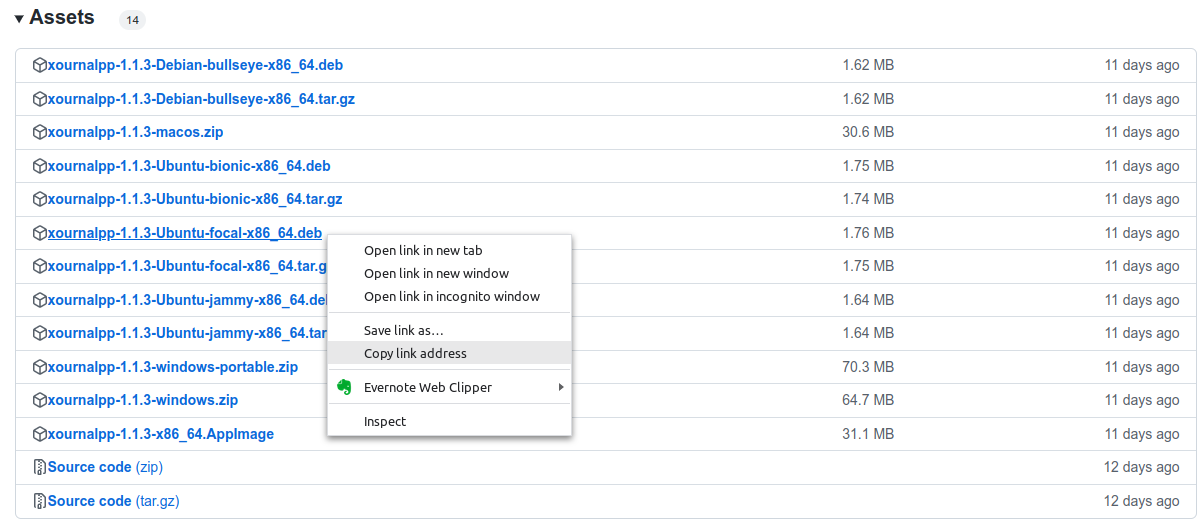
Get the download link from the list of assets. Choose the one suitable for your version of operating system. 


Download the deb file
$ wget https://github.com/xournalpp/xournalpp/releases/download/v1.1.3/xournalpp-1.1.3-Ubuntu-focal-x86_64.deb

And install it using apt
$ sudo apt install ./xournalpp-1.1.3-Ubuntu-focal-x86_64.deb -y
Once installed just launch xournal++ from your application launcher, 


or you can also launch it from terminal by running
$ xournalpp

Thursday, May 12, 2022

Change metadata in PDF file using exiftool

To change the metadata in PDF files, use a command line tool called exiftool. This tool can manipulate metadata in many file types, but in this post we will focus on changing the metadata in a pdf file.


To install this tool in ubuntu, run below command
$ sudo apt install libimage-exiftool-perl -y

Then, use the exiftool command to list out all the metadata in a pdf file
$ exiftool mypdf.pdf

Some details like below will be shown
ExifTool Version Number         : 11.88
File Name                       : mypdf.pdf
Directory                       : .
File Size                       : 1 MB
File Modification Date/Time     : 2022:12:08 07:46:39+08:00
File Access Date/Time           : 2022:12:08 07:46:43+08:00
File Inode Change Date/Time     : 2022:12:08 07:46:39+08:00
File Permissions                : rw-rw-r--
File Type                       : PDF
File Type Extension             : pdf
MIME Type                       : application/pdf
PDF Version                     : 1.3
Linearized                      : No
Page Count                      : 15
XMP Toolkit                     : Image::ExifTool 11.88
Title                           : mypdf.pdf
Producer                        : Nitro PDF PrimoPDF
Create Date                     : 2022:09:30 16:57:06-08:00
Modify Date                     : 2022:09:30 16:57:06-08:00
Creator                         : PrimoPDF http://www.primopdf.com
Author                          : andre

To see just one tag, we can specify it when running exiftool. Let's say I want to see just the Author
$ exiftool -Author mypdf.pdf
Author                          : andre

To change the value of the tag, just provide the new value to the tag in the exiftool command. Let's say I want to change the author from andre to john
$ exiftool -Author=john mypdf.pdf

We can verify that the change has been implemented
$ exiftool -Author mypdf.pdf
Author                          : john

Once we are satisfied with the change, delete the original backup file that exiftool created prior to changing the metadata
$ rm mypdf.pdf_original


Sunday, May 1, 2022

Synchronize commands across panes in tmux

One of the neat feature of tmux is, it has the ability to synchronize commands typed in one pane to all pane in the same window in tmux. This trick will help you run command across multiple terminals with just one time typing. 


One example, that this might come in handy, is if you have 4 servers to be updated, you can just fire up a tmux, split the window into 4 panes, and ssh to each server in each pane. Set synchronize pane option, and you just have to run the command once, and the command will be repeated in all panes.

To use this, we need a windows splitted into at least 2 panes.

First, start a tmux session
$ tmux

Once inside tmux, do a horizontal split by pressing 
ctrl-b "

To turn on syncrhronize-pane
ctrl-b :

Then type
setw synchronize-panes on

Now you can type in one pane, and the command will be repeated in other panes as well.

To turn off synchonize-panes mode, type
ctrl-b :

Then type
setw synchronize-panes on

Good luck