Showing posts with label container. Show all posts

Monday, March 2, 2026

Running linux container using incus

Incus is a manager for system container, application container and virtual machine. It provides a user experience similar to public cloud, and gives the ability for user to manage containers and virtual machines in one platform.

This post will show you how to install incus, and run a system container using incus.

To install incus in an ubuntu machine, just run this command:
$ sudo apt update && sudo apt install incus -y

Once installed, add your current user to the incus and incus-admin group to enable controlling incus without using sudo
$ sudo usermod -G incus -a $(whoami)
$ sudo usermod -G incus-admin -a $(whoami)

Log into incus-admin group to start using incus command (once you log out and log in back again, you do not need to do this) 
$ newgrp incus-admin

Initialize incus,with minimal setting
$ incus admin init --minimal

You can now list ubuntu images from the incus repository
$ incus image list images:ubuntu

Then run your first incus container based on ubuntu 26.04, named myfirstcontainer
$ incus launch images:ubuntu/26.04 myfirstcontainer

You can now list out the containers that you have launched
$ incus ls

Tuesday, July 23, 2024

Linux Container (LXC) 101

LXC is a userspace interface for the Linux kernel containment features. Through a powerful API and simple tools, it lets users easily create and manage system or application containers.

The main usage of LXC in my scenario is, to test out any application in linux before deploying to the real environment, without disturbing my host linux. I used to use virtualbox, but LXC is lighter in terms of resources usage, but only applicable to linux. 

To install lxc in an ubuntu machine:
$ sudo apt update && sudo apt install lxc -y

Once installed, you now have access to multiple lxc-* commands. 


If our ufw firewall is turned on, we need to allow traffic to and from the bridge, and also allow traffic forwarded to the bridge. The name of the bridge is usually lxcbr0
$ sudo ufw allow in on lxcbr0
$ sudo ufw route allow in on lxcbr0
$ sudo ufw route allow out on lxcbr0

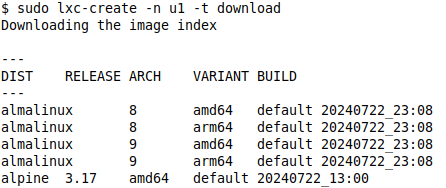
To create a container, use lxc-create command. For example, to create a container named as u1, using a template from https://images.linuxcontainers.org/, in an interactive mode (where you get to select distribution, release and architecture interactively), use below command
$ sudo lxc-create -n u1 -t download


To create a same almalinux container, named u2, using a template from https://images.linuxcontainers.org/ but in a non interactive mode, use below command
$ sudo lxc-create -n u2 -t download -- -d almalinux -r 8 -a amd64 


To list out all created containers, use below command 
$ sudo lxc-ls


To get a better listing, use fancy mode (-f)
$ sudo lxc-ls -f


To start the containers, just use lxc-start
$ sudo lxc-start u1
$ sudo lxc-start u2


After a while, the containers will get ip addresses


To access the shell of the containers, we use lxc-attach
$ sudo lxc-attach u1


To exit the shell, just type exit


To destroy the containers, we need to stop the container first.
$ sudo lxc-stop u1
$ sudo lxc-destroy u1


Monday, June 12, 2023

Autostart podman containers on host boot/reboot

Podman is an excellent alternative to docker, but it would not survive host reboot since it does not have any daemon running. Is all hope lost? Nope, podman has one trick up its sleeve that can save the day.


Introducing "podman generate" command. This command can generate yaml, json or systemd file for any containers. In this case, we are going to generate a systemd script for our container, to make sure it survives host reboot.

How to use this tool? First we need a running container.

Once we have a running container, simply run below command to create systemd service file for your container (in this example, mycontainer is the name of the container), and save it to a file called container-mycontainer.service.
$ podman generate systemd --new --name mycontainer -f

Then, move the conatainer-mycontainer.service file into /etc/systemd/system, for systemd to start recognizing your service (we changed the name to just mycontainer.service, to shorten the name, and make it easier to type). 
$ sudo mv container-mycontainer.service /etc/systemd/system/mycontainer.service

After that, we need to reload the systemd for the root user, to make systemd aware of the new service.
$ sudo systemctl daemon-reload

Now, start the new service, and enable it on every boot
$ sudo systemctl enable --now mycontainer.service

Check whether your new service is running
$ sudo systemctl status mycontainer.service


Thursday, December 22, 2022

How to Install Podman on Ubuntu 22.04

Podman is a daemonless, open source, Linux native tool designed to make it easy to find, run, build, share and deploy applications using Open Containers Initiative (OCI) Containers and Container Images. 

Podman provides a command line interface (CLI) familiar to anyone who has used the Docker Container Engine.

Some of the advantages of podman over docker
1. Podman is daemonless
2. Podman is fully compatible with docker, thus one can run docker images without any modification even from docker.io
3. Most podman commands can be run as a regular user, without requiring additional privileges.

To install podman on ubuntu 22.04:

1. Update apt database 
$ sudo apt update

2. Install podman
$ sudo apt install podman

3. Check podman version
$ podman -v

4. Test podman
$ podman run docker.io/hello-world

5. If you get someting like below, your podman installation is successul and it is able to pull and run image from dockerhub


Tuesday, March 15, 2022

Running a postgresql database using singularity

First, we need to pull the postgresql image from dockerhub

singularity pull docker://postgres:14.2-alpine3.15

The image will be saved as postgres_14.2-alpine3.15.sif. Now, create an environment file
cat >> pg.env <<EOF
export TZ=Asia/Kuala_Lumpurt
export POSTGRES_USER=pguser
export POSTGRES_PASSWORD=mypguser123
export POSTGRES_DB=mydb
export POSTGRES_INITDB_ARGS="--encoding=UTF-8"
EOF

Create 2 directories for data and run
mkdir pgdata
mkdir pgrun

Run the container. The options are -B to bind mount local directory to container, -e to clean environment before running the container, -C to start the container with PID, IPC and environment, and --env-file is to pass the environment variables in the file to the container
singularity run -B pgdata:/var/lib/postgresql/data -B pgrun:/var/run/postgresql -e -C --env-file pg.env postgres_14.2-alpine3.15.sif

The postgresql will be listening on localhost at port 5432. To test it out, just open another terminal, and use the same postgres_14.2-alpine3.15.sif to run psql
singularity exec postgres_14.2-alpine3.15.sif psql -h localhost -p 5432 -d mydb

mydb=#  

Thursday, March 10, 2022

Running a simple nginx web server with custom index file using singularity

First, create a directory to house our index.html file
mkdir web

Create our custom index file
cat >> web/index.html<<EOF
<html>
<h1>This is my index<h1>
</html>

EOF 


Then, download the image from dockerhub. The image will be downloaded as nginx_latest.sif.
singularity pull docker://nginx

Run instance, and mount the web directory to /usr/share/nginx/html in the instance. The options are, -B to bind the web directory in the host machine to the /usr/share/nginx/html in the container, while the --writable-tmpfs is to allow the container to write temporary files during execution. The container will be running on localhost port 80.
sudo singularity run -B web/:/usr/share/nginx/html --writable-tmpfs nginx_latest.sif

Check if our webserver is running fine using a standard web browser:


Saturday, March 5, 2022

Running a simple nginx web server using singularity

In this example, we will use the nginx web server image from docker hub.


1. Pull the nginx image from dockerhub. The image will be saved as nginx_latest.sif
singularity pull docker://nginx

2. Run an instance of nginx. We need to put --writable-tmpfs option so that the instance can write temporary files to disk.
sudo singularity run --writable-tmpfs docker://nginx web

3. To test, open a new terminal, and use curl to access http://localhost. We should be able to access the landing page of nginx running inside a singularity container 
curl localhost

<!DOCTYPE html>

10.22.0.1 - - [05/Mar/2022:15:45:10 +0800] "GET / HTTP/1.1" 200 615 "-" "curl/7.68.0" "-"

<html>

<head>

<title>Welcome to nginx!</title>

<style>

html { color-scheme: light dark; }

... 


 4. We can also use a web browser and browse to localhost


Tuesday, March 1, 2022

Running docker "hello-world" image using singularity

One of the advantage of singularity is, it does not require any service to run containers. And the images that you downloaded will be saved in normal files in your filesystem, rather than in some cache directory like docker.


To run dockerhub's hello-world image using singularity:


1. Pull the image from dockerhub

$ singularity pull docker://hello-world


2. The image will be saved as hello-world_latest.sif

$ ls 

hello-world_latest.sif


3.1 To run a container based on that image, just use "singularity run" against the sif file

$ singularity run  hello-world_latest.sif

...

Hello from Docker!      

This message shows that your installation appears to be working correctly.

...

3.2 Or you can just "./" the sif file
$ ./hello-world_latest.sif

...

Hello from Docker!      

This message shows that your installation appears to be working correctly.

...

Monday, February 21, 2022

Installing singularity in ubuntu 20.04

SingularityCE is a container platform. It allows you to create and run containers that package up pieces of software in a way that is portable and reproducible. 

You can build a container using SingularityCE on your laptop, and then run it on many of the largest HPC clusters in the world, local university or company clusters, a single server, in the cloud, or on a workstation down the hall.

Your container is a single file, and you don’t have to worry about how to install all the software you need on each different operating system.

In short, singularity is an alternative to docker.

To install singularity in ubuntu 20.04:

1. Update repositories
$ sudo apt update

2. Download the installer. Please refer to the github page for the latest version. 3.9.7 is the latest version when this guide is being written
$ wget https://github.com/sylabs/singularity/releases/download/v3.9.7/singularity-ce_3.9.7-bionic_amd64.deb

3. Install singularity
$ sudo apt install ./singularity-ce_3.9.7-bionic_amd64.deb

4. Test singularity
$ singularity version
3.9.7-bionic

Sunday, April 18, 2021

Running php-fpm and Nginx in Docker

Php-fpm is an advanced and highly efficient processor for php. In order for your php files to be viewable in a web browser, php-fpm needs to be coupled with a web server, such as nginx. In this tutorial we will show how to setup php-fpm and nginx is docker.

1. Create a directory for your files 

$ sudo mkdir phpfpm

2. Create a network for the containers to use. This makes sure that we can use container's name in the configuration file.

$ docker network create php-network

3. Create nginx config file

$ cd phpfpm

$ cat > default.conf <<EOF

server {

    listen  80;    

# this path MUST be exactly as docker-compose.fpm.volumes,

    # even if it doesn't exist in this dock.

    root /complex/path/to/files;

    location / {

        try_files $uri /index.php$is_args$args;

    }

    location ~ ^/.+\.php(/|$) {

        fastcgi_pass fpm:9000;

        include fastcgi_params;

        fastcgi_param SCRIPT_FILENAME $document_root$fastcgi_script_name; 

    }

}

EOF

4. Create an index.php file with some random php code (we are using phpinfo() to make it easier)

$ cat > index.php <<EOF

<?php phpinfo(); ?> 

EOF

5. Run a php-fpm container, in detached and intaractive mode, using php-network, and we mount /home/user/phpfpm to /var/www/html in container

$ docker run -dit --name fpm --network php-network -v /home/user/phpfpm:/var/www/html

6. Run an nginx container in detached and intaractive mode, using php-network, and we mount /home/user/phpfpm/default.conf to /etc/nginx/conf.d/default.conf in container

$ docker run -dit --name nginx --network php-network -v /home/user/phpfpm/default.conf:/etc/nginx/conf.d/default.conf -p 80:80 nginx

7. Open a browser, and browse to http://localhost, you should now be able to see the PHPinfo page. 

Of course, there is an easier way to set this up using docker-compose. We will cover that in another post.


Thursday, December 24, 2020

Using Volume in Docker to Store Persistent Data

Docker container is not persistent, that means, the data stored in a docker container will be gone if the container is destroyed. One of the way to store persistent data while using docker container, is to use the docker volume feature to store your data. 


To use the volume, we need to create the volume first. 

$ docker volume create myvolume


We can inspect the volume's detailed information using inspect command. This is how we get to know where exactly in filesystem, that the volume resides. and all other information about the volume.

$ docker volume inspect myvolume

[

    {

        "CreatedAt": "2020-12-24T09:18:03+08:00",

        "Driver": "local",

        "Labels": {},

        "Mountpoint": "/var/lib/docker/volumes/myvolume/_data",

        "Name": "myvolume",

        "Options": {},

        "Scope": "local"

    }

]


To make use of the volume, we will use the --volume flag of the docker run command. For example, we want to create a container from an alpine linux image, run a command in it (in this example, a date command), store the output of the command in a volume, exit, and delete the container after that.

$ docker run --rm --volume=myvolume:/tmp alpine sh -c "date > /tmp/currenttime"


Once the container finished running, we can go to the location of the volume in the filesystem, and we can retrieve the file that is created by the container, even though that container no longer exist.

$ sudo ls /var/lib/docker/volumes/myvolume/_data

currenttime

$ sudo cat  /var/lib/docker/volumes/myvolume/_data/currenttime

Thu Dec 24 01:25:34 UTC 2020


So this is how my friend, one of the way to store persistent data generated using docker container.

Wednesday, December 23, 2020

Installing Wordpress using Podman

Podman is a daemonless container engine to manage OCI containers. To run a set of containers for wordpress installation, below are the steps. To install podman in centos 8, you can refer here.

First you need to create a pod, so that the containers can talk to each other easily within the pod. Expose port 8080 for the pod to reach port 80 in the pod

# podman pod create --name mywordpress --publish 8080:80


Wordpress consists of 2 components, a wordpress front end and a database backend. We will create the backend first, using mysql image from dockerhub. Make sure to include the newly created container into our pod.

# podman run --detach --pod mywordpress \

-e MYSQL_ROOT_PASSWORD=1234 \

-e MYSQL_DATABASE=mywpdb \

-e MYSQL_USER=mywpuser \

-e MYSQL_PASSWORD=1234 \

--name mywpdb docker.io/mysql


We will then proceed to create a wordpress container. We will use 127.0.0.1 (localhost) as reference to our mysql container, because both containers are in the same pod.

# podman -run --detach --pod mywordpress \

-e WORDPRESS_DB_HOST=127.0.0.1 \

-e WORDPRESS_DB_NAME=mywpdb

-e WORDPRESS_DB_USER=mywpuser \

-e WORDPRESS_DB_PASWORD=1234 \

--name mywp docker.io/wordpress


Open a web browser, and browse to localhost:8080 (or <ip address>:8080), to get the wordpress installer wizard. Follow through the wizard to continue the wordpress installation.

Wednesday, November 4, 2020

Minio on podman failed to run due to wrong selinux tag

 I tried to install minio on podman, following this guide.


I created a directory for data

# mkdir /data


I then start minio container

# podman run -dit -p 9000:9000 -e "MINIO_ACCESS_KEY=minioadmin" -e "MINIO_SECRET_KEY=myminioadmin" -v /data:/data  minio/minio server /data


The container was started, but exited as soon as it finished starting up

# podman ps

CONTAINER ID  IMAGE                         COMMAND       CREATED        STATUS            PORTS                   NAMES

# podman ps -a
CONTAINER ID  IMAGE                         COMMAND       CREATED        STATUS            PORTS                   NAMES
fb7073bc3baf  docker.io/minio/minio:latest  server /data  6 minutes ago  Exited (1) 6 minutes ago   0.0.0.0:9000->9000/tcp  wonderful_galois


Checking the log, I found out that the container failed to start due to permission error on the /data
# podman logs fb 

The error is as in below image
selinux error while starting minio container

I checked the directory, but the permission is correct
# ls -ld /data
drwxr-xr-x. 3 root root 24 Nov  4 03:55 /data


This must be selinux. So I searched around for a proper tag for minio related files and directories. Referring to this article, I decided to use the tag for content as per that article.
# chcon -R system_u:object_r:container_file_t:s0 /data


Now, time to test. I rerun the container.
# podman start fb
# podman ps
CONTAINER ID  IMAGE                         COMMAND       CREATED         STATUS            PORTS                   NAMES
fb7073bc3baf  docker.io/minio/minio:latest  server /data  14 minutes ago  Up 2 seconds ago  0.0.0.0:9000->9000/tcp  wonderful_galois


Yes, it worked. If you guys ever encounter the permission issue, make sure to check the selinux tag, besides checking the standard unix permission on the directory.

Thursday, April 30, 2020

Run a Joomla CMS in Podman Pod

One of the special feature of podman over docker is, podman has the concept of pod. Pod is a feature to group containers together. One example is, is lets say we want to deploy a joomla stack. The stack can be deployed in a pod, so that the containers can be managed together, without having to operate on each single component of the stack.

To create a pod with port 8080 on localhost will be redirected to port 80 in a pod
$ podman pod create --name mypod --publish 8080:80

Next, create a container for database that belongs to our pod above
$ podman run -dit --pod mypod -e MYSQL_DATABASE=joomla -e MYSQL_USER=joomlauser -e MYSQL_PASSWORD=joomlapassword -e MYSQL_ROOT_PASSWORD=rootpw --name mariadb docker.io/library/mariadb 

Check whether your mariadb container is ready, by viewing its logs
$ podman logs -f mariadb

After that create a joomla container. Since both the containers are in the same pod, joomla container can refer to mariadb with just 127.0.0.1 since both of them share the same network namespace in a pod
$ podman run -dit --pod mypod -e JOOMLA_DB_HOST=127.0.0.1 -e JOOMLA_DB_USER=joomlauser -e JOOMLA_DB_PASSWORD=joomlapassword -e JOOMLA_DB_NAME=joomla --name joomla docker.io/library/joomla

Similar to mariadb container, you can check whether your joomla container is ready by viewing its logs
$ podman logs -f joomla

Start a browser, and browse to http://0.0.0.0:8080. You should be able to access the joomla web interface. Continue with the installation using the web interface. Make sure you put 127.0.0.1 for the database host information in the web installer.


Saturday, April 25, 2020

Starting a Web Server using Podman

To start a web server using podman, in this case we are using nginx from docker repository, just run below command to start a webserver and expose it on port 8080 localhost
$ podman run -dit -p 8080:80 docker.io/library/nginx

Test our brand new web server
$ curl -s localhost:8080 | tail
working. Further configuration is required.</p>

<p>For online documentation and support please refer to
<a href="http://nginx.org/">nginx.org</a>.<br/>
Commercial support is available at
<a href="http://nginx.com/">nginx.com</a>.</p>

<p><em>Thank you for using nginx.</em></p>
</body>
</html>


Friday, April 24, 2020

How to Install Podman on CentOS 8

Podman is a daemonless container engine for developing, managing, and running OCI Containers on your Linux System. 

Some of the advantages of podman over docker for managing your linux containers are:
1. Podman is daemonless
2. Podman is fully compatible with docker, thus can run docker images without any modification even from docker.io
3. Most podman commands can be run as a regular user, without requiring additional privileges. 
4. Used by Redhat in latest openshift container platform

To install podman on CentOS 8, just run below command

# dnf install podman -y
or 

# yum install -y podman

Once installed, check podman version to ensure podman has been installed successfully
# podman --version


Wednesday, April 10, 2019

Create a mini lab for practicing ansible using docker

To practice ansible, you need to have at least 2 machines. I suggest using containers rather than VM, since containers can be quickly spawned, and are light on the resources.


First, make sure you have docker Community Edition installed. If not, follow the install guide here.

Check your docker version
# docker version

Start the docker engine
# sudo systemctl start docker 

In this exercise, we will use ubuntu as our base operating system. So, run a container using the ubuntu image from docker hub. The options are -i for interactive, -t to allocate pseudo TTY and -d to run the container in the background
# docker run -it -d --name="ansible-master" ubuntu

The ubuntu image does not come with ssh, which is needed for ansible, so we need to install that, together with vim text editor 
# docker exec -it apt update; apt install vim openssh-server -y

Change the root password
# docker exec -it ansible-master passwd 

Permit root login for ssh
# docker exec -it ansible-master /bin/bash
ansible-master: # cat >> /etc/ssh/sshd_config <<EOF
PermitRootLogin yes
EOF

Start ssh
ansible-master: # service ssh start; exit

Create an image based on ansible-master. This image will be used later to create ansible-client1 container
# docker commit -m "ubuntu with vim and openssh-server" ansible-master myubuntu:2019041001

Run a container called ansible-client1 from the image created above
# docker image ls
REPOSITORY          TAG                 IMAGE ID            CREATED             SIZE
myubuntu            2019041001          17f43a3ef384        10 minutes ago      265MB
# docker run -d -it --name="ansible-client1" myubuntu:2019041001

Start ssh service on ansible-client1
# docker exec -it ansible-client1 service ssh start

Try to ssh into both machines. Get the ip address of the containers using "docker inspect" command
# docker inspect ansible-client1 | grep -w IPAddress
            "IPAddress": "172.17.0.3",
                    "IPAddress": "172.17.0.3",
# docker inspect ansible-master | grep -w IPAddress
            "IPAddress": "172.17.0.2",
                    "IPAddress": "172.17.0.2",
# ssh root@172.17.0.2
# ssh root@172.17.0.3

Install ansible on ansible-master
# docker exec -it ansible-master apt install ansible -y

Check ansible version
# docker exec -it ansible --version

Create ssh-key without password
# docker exec -it ssh-keygen

Transfer the key to ansible-client1
# docker exec -it ssh-copy-id 172.17.0.3

Edit /etc/ansible/hosts to include all nodes
# docker exec -it ansible-master /bin/bash
ansible-master: # cat >> /etc/ansible/hosts <<EOF
localhost
ansible-client1 ansible_host=172.17.0.3

[all]
localhost
ansible-client1
EOF


Test ansible using ping module
# docker exec -it ansible-master -m ping all
localhost | SUCCESS => {
    "changed": false, 
    "ping": "pong"
}
ansible-client1 | SUCCESS => {
    "changed": false, 
    "ping": "pong"
}

Congratulations, now you have your own mini ansible lab, using docker. You can add more clients as you wish later.

Thursday, March 7, 2019

Run an Application with GUI with Docker

There are a few ways to achieve this, like vnc and ssh X forwarding. But in this post, I will show how to run firefox by sharing the .Xauthority file with the docker instance.


First, create a Dockerfile in a directory called docker that use an ubuntu image from dockerhub, and install the firefox application

$ mkdir docker
$ cd docker
$ cat > Dockerfile
FROM ubuntu
RUN apt update && apt install -y firefox
CMD ["/usr/bin/firefox"]

Press ctrl-d to save the file


Next, build an image using the above Dockerfile

$ sudo docker build --tag=firefox-app docker/


Then, run the image, with additional options of --network and --env, and sharing our host .Xauthority file with the container that we are going to run 

$ sudo docker run --network=host --env="DISPLAY" --volume="$HOME/.Xauthority:/root/.Xauthority:rw" --name=firefox1 firefox-app


You should be able to get a working firefox, running from a docker container, separated from the current firefox that you have in your current machine

Credit: https://medium.com/@SaravSun/running-gui-applications-inside-docker-containers-83d65c0db110

