Monday, February 2, 2026

Using buffers in vim

Using buffer is simply a way to open multiple documents in a single vim session.


For example, you want to open /etc/passwd, and copy some of it contents into a new file called /tmp/mylist. 

What you would do:

1. open /etc/passwd
$ vim /etc/passwd

2. while in vim, open a new buffer 
:e /tmp/mylist

3. To list all opened buffers, we can use :ls. This is also a way you can know the buffer number
:ls

4. To move to a buffer number
:b <buffer number>

5. We can also use some part of the file name to move to the buffer that the file is opened
:b passwd

6. We can also use :bn to go to the next buffer in the list, or :bp to go to the previous buffer in the list

7. To copy contents between buffer
  • highlight the text that you want to copy in the current buffer (v)
  • then use the usual yank (y) to copy the highlighted texts
  • switch to the target buffer using (:bp), (:bn), (:b number) or (:b filename)
  • paste using paste command (p)

Wednesday, November 6, 2024

Rotating screen in Linux Desktop

Sometimes we need to capture an output of a command that is quite long, it could not fit in one screenshot. Rotating screen is one of the way to make the screen estate longer, but in linux, the method is not as straight forward as in our smartphones.


To do this, one of the method is using "xrandr" command. 

The usage is fairly simple, just use xrandr with "-o" option, and which way we want to rotate the screen to.

For example, to rotate the screen left, we use:
$ xrandr -o left

To rotate the screen to right:
$ xrandr -o right

To invert the screen:
$ xrandr -o inverted

To rotate the screen back to its normal position:
$ xrandr -o normal

Do not worry though, only the screen is rotated, your keyboard and mouse still work the same.

Thursday, October 10, 2024

Installing docker and docker compose on almalinux 9

Docker does not explicitly support almalinux, so we have to use centos repository instead.


Below are the steps:

1. Update system
sudo dnf --refresh update
sudo dnf upgrade -y

2. Enable docker repository
sudo dnf install yum-utils
sudo yum-config-manager --add-repo https://download.docker.com/linux/centos/docker-ce.repo

3. Install docker
sudo dnf install docker-ce docker-ce-cli containerd.io docker-compose-plugin -y

4. Enable and start docker
sudo systemctl enable --now docker

5. Add user to docker group
sudo usermod -G docker -a myuser

6. Refresh group list 
newgrp

7. Check docker and docker compose version
docker version
docker compose version          

Thursday, August 8, 2024

Linux Mint unable to connect to 2.4GHz wireless, but no problem connecting to 5GHz wireless

I have this issue whereby a laptop of mine, which is running Linux Mint 21.2, was unable to connect to my 2.4GHz wife connection. I have no issue connecting to the 5GHz connection, only 2.4Ghz is having issue. I turned to linux mint forum, and found this post, which explained the issue, and the solution was to change my backend wifi device from wpa-supplicant to iwd. It seems that the current wifi daemon at that time, which was wpasupplicant was having issue connecting to 2.4GHz wifi connection. 

Here are the steps:

1. Install iwd

sudo apt update && sudo apt install iwd -y


2. Create a configuration file in /etc/NetworkManager/conf.d/wifi-backend.conf 

sudo nano /etc/NetworkManager/conf.d/wifi-backend.conf 


3. Add in below setting

[device]

wifi.backend=iwd


4. Save and exit nano by pressing ctrl-o and then ctrl-x


5. Stop and disable wpa_supplicant daemon

sudo systemctl disable --now wpa_supplicant


6. Start and enable iwd

sudo systemctl enable --now iwd


7. Restart NetworkManager daemon

sudo systemctl restart NetworkManager


And you are good  to go. You should now be able to connect to the 2.4GHz wireless, without any issue. 

Tuesday, July 23, 2024

Linux Container (LXC) 101

LXC is a userspace interface for the Linux kernel containment features. Through a powerful API and simple tools, it lets users easily create and manage system or application containers.

The main usage of LXC in my scenario is, to test out any application in linux before deploying to the real environment, without disturbing my host linux. I used to use virtualbox, but LXC is lighter in terms of resources usage, but only applicable to linux. 

To install lxc in an ubuntu machine:
$ sudo apt update && sudo apt install lxc -y

Once installed, you now have access to multiple lxc-* commands. 


If our ufw firewall is turned on, we need to allow traffic to and from the bridge, and also allow traffic forwarded to the bridge. The name of the bridge is usually lxcbr0
$ sudo ufw allow in on lxcbr0
$ sudo ufw route allow in on lxcbr0
$ sudo ufw route allow out on lxcbr0

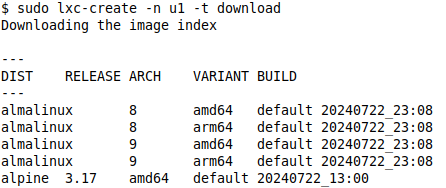
To create a container, use lxc-create command. For example, to create a container named as u1, using a template from https://images.linuxcontainers.org/, in an interactive mode (where you get to select distribution, release and architecture interactively), use below command
$ sudo lxc-create -n u1 -t download


To create a same almalinux container, named u2, using a template from https://images.linuxcontainers.org/ but in a non interactive mode, use below command
$ sudo lxc-create -n u2 -t download -- -d almalinux -r 8 -a amd64 


To list out all created containers, use below command 
$ sudo lxc-ls


To get a better listing, use fancy mode (-f)
$ sudo lxc-ls -f


To start the containers, just use lxc-start
$ sudo lxc-start u1
$ sudo lxc-start u2


After a while, the containers will get ip addresses


To access the shell of the containers, we use lxc-attach
$ sudo lxc-attach u1


To exit the shell, just type exit


To destroy the containers, we need to stop the container first.
$ sudo lxc-stop u1
$ sudo lxc-destroy u1