Monday, March 2, 2026

Running linux container using incus

Incus is a manager for system container, application container and virtual machine. It provides a user experience similar to public cloud, and gives the ability for user to manage containers and virtual machines in one platform.

This post will show you how to install incus, and run a system container using incus.

To install incus in an ubuntu machine, just run this command:
$ sudo apt update && sudo apt install incus -y

Once installed, add your current user to the incus and incus-admin group to enable controlling incus without using sudo
$ sudo usermod -G incus -a $(whoami)
$ sudo usermod -G incus-admin -a $(whoami)

Log into incus-admin group to start using incus command (once you log out and log in back again, you do not need to do this) 
$ newgrp incus-admin

Initialize incus,with minimal setting
$ incus admin init --minimal

You can now list ubuntu images from the incus repository
$ incus image list images:ubuntu

Then run your first incus container based on ubuntu 26.04, named myfirstcontainer
$ incus launch images:ubuntu/26.04 myfirstcontainer

You can now list out the containers that you have launched
$ incus ls

Wednesday, February 18, 2026

Combining pdf files in linux command line using pdfunite

Before this, I have shared a way to combine pdf files using a tool called pdftk. You can refer the article explaining pdftk, here. The tool is fine, but I have found another tool which is smaller in size, and does the same thing. 


Presenting, pdfunite. This little tool is a one of the component inside a package called poppler-utils.

To install, in Ubuntu flavored linux:
$ sudo apt update && sudo apt install poppler-utils -y

and in Red Hat flavored linux:
$ sudo dnf install poppler-utils -y

To use the tool, simply run the tool, followed by the pdf files to be combined, and finally the output file name. For example, to combine file1.pdf and file2.pdf into result.pdf, use below command:
$ pdfunite file1.pdf file2.pdf result.pdf

Simple and easy. 

Tuesday, February 10, 2026

Watch anime from Linux command line

This is a really cool feature for anime lovers. You can search and watch anime just from the command line, how convenient is that? All the commands below were run in a Linux Mint, please adjust accordingly if you are not using Linux Mint 😁


Step 1: Launch your terminal

Step 2: Download and install ani-cli and mpv player
$ sudo apt update && sudo apt install ani-cli mpv -y

Step 3: Search for your favourite anime using ani-cli command. In the following example, I was searching for "One Piece" anime 720 video quality. If you somehow prefer vlc, you can add -v option. BY default it will use mpv video player.
$ ani-cli -q 720 one piece

Step 4: Choose from the list, which entry (or season) that you wan to watch


Step 5: Choose the episode


Step 6: Watch your anime 


Optional step: Once you know the list number and episode, you can directly go to the view by using below options:
$ ani-cli -q 720 -S 1 -e 1 one piece

Happy watching!

Thursday, February 5, 2026

Using splits in vim

Using split is a way that user can open multiple documents in one vim session, but all the documents will be displayed in one display, split across the screen.


For example, we want to copy some content from /etc/passwd, into a file called /tmp/mylist

1. open /etc/passwd
$ vim /etc/passwd

2. To create splits 
  • to create vertical split and divide vim into 2 panels side by side, with the new panel opening /tmp/mylist
:vsp /tmp/mylist
  • To create a horizontal split and divide vim into 2 parts, bottom and up, with the new panel opening a file called /tmp/mylist, use this command
:sp /tmp/mylist
  • You can also create an empty buffer on the new horizontally split panel
:new 
  • And to create an empty buffer on the new vertically split panel
:vnew

3. To move between panels
  • ctrl-w h or ctrl-w left arrow to move left
  • ctrl-w j or ctrl-w down arrow to move down
  • ctrl-w k or ctrl-w up arrow to move up
  • ctrl-w l or  ctrl-w right arrow to move right

4. To close, use below commands 
  • :q to close current panel
  • :only to close other panels except the current one
  • :qa to close all panels
  • :qa! to force close all panels without saving

5. To resize the panels
  • ctrl-w + or ctrl-w - to increase or decrease the current panel's height
  • ctrl-w > or ctrl-w < to increase or decrease the current panel's width
  • ctrl-w _ to maximize the current panel's height
  • ctrl-w | to maximize the current panel's width
  • ctrl-w = to make the panels' width and height uniform
6. To open multiple files in split mode
  • vim -o file1 file2 to open file1 and file2 in horizontal split
  • vim -O file1 file2 to open file1 and file2 in vertical split

Monday, February 2, 2026

Using buffers in vim

Using buffer is simply a way to open multiple documents in a single vim session.


For example, you want to open /etc/passwd, and copy some of it contents into a new file called /tmp/mylist. 

What you would do:

1. open /etc/passwd
$ vim /etc/passwd

2. while in vim, open a new buffer 
:e /tmp/mylist

3. To list all opened buffers, we can use :ls. This is also a way you can know the buffer number
:ls

4. To move to a buffer number
:b <buffer number>

5. We can also use some part of the file name to move to the buffer that the file is opened
:b passwd

6. We can also use :bn to go to the next buffer in the list, or :bp to go to the previous buffer in the list

7. To copy contents between buffer
  • highlight the text that you want to copy in the current buffer (v)
  • then use the usual yank (y) to copy the highlighted texts
  • switch to the target buffer using (:bp), (:bn), (:b number) or (:b filename)
  • paste using paste command (p)

Wednesday, November 6, 2024

Rotating screen in Linux Desktop

Sometimes we need to capture an output of a command that is quite long, it could not fit in one screenshot. Rotating screen is one of the way to make the screen estate longer, but in linux, the method is not as straight forward as in our smartphones.


To do this, one of the method is using "xrandr" command. 

The usage is fairly simple, just use xrandr with "-o" option, and which way we want to rotate the screen to.

For example, to rotate the screen left, we use:
$ xrandr -o left

To rotate the screen to right:
$ xrandr -o right

To invert the screen:
$ xrandr -o inverted

To rotate the screen back to its normal position:
$ xrandr -o normal

Do not worry though, only the screen is rotated, your keyboard and mouse still work the same.

Thursday, October 10, 2024

Installing docker and docker compose on almalinux 9

Docker does not explicitly support almalinux, so we have to use centos repository instead.


Below are the steps:

1. Update system
sudo dnf --refresh update
sudo dnf upgrade -y

2. Enable docker repository
sudo dnf install yum-utils
sudo yum-config-manager --add-repo https://download.docker.com/linux/centos/docker-ce.repo

3. Install docker
sudo dnf install docker-ce docker-ce-cli containerd.io docker-compose-plugin -y

4. Enable and start docker
sudo systemctl enable --now docker

5. Add user to docker group
sudo usermod -G docker -a myuser

6. Refresh group list 
newgrp

7. Check docker and docker compose version
docker version
docker compose version          

Thursday, August 8, 2024

Linux Mint unable to connect to 2.4GHz wireless, but no problem connecting to 5GHz wireless

I have this issue whereby a laptop of mine, which is running Linux Mint 21.2, was unable to connect to my 2.4GHz wife connection. I have no issue connecting to the 5GHz connection, only 2.4Ghz is having issue. I turned to linux mint forum, and found this post, which explained the issue, and the solution was to change my backend wifi device from wpa-supplicant to iwd. It seems that the current wifi daemon at that time, which was wpasupplicant was having issue connecting to 2.4GHz wifi connection. 

Here are the steps:

1. Install iwd

sudo apt update && sudo apt install iwd -y


2. Create a configuration file in /etc/NetworkManager/conf.d/wifi-backend.conf 

sudo nano /etc/NetworkManager/conf.d/wifi-backend.conf 


3. Add in below setting

[device]

wifi.backend=iwd


4. Save and exit nano by pressing ctrl-o and then ctrl-x


5. Stop and disable wpa_supplicant daemon

sudo systemctl disable --now wpa_supplicant


6. Start and enable iwd

sudo systemctl enable --now iwd


7. Restart NetworkManager daemon

sudo systemctl restart NetworkManager


And you are good  to go. You should now be able to connect to the 2.4GHz wireless, without any issue. 

Tuesday, July 23, 2024

Linux Container (LXC) 101

LXC is a userspace interface for the Linux kernel containment features. Through a powerful API and simple tools, it lets users easily create and manage system or application containers.

The main usage of LXC in my scenario is, to test out any application in linux before deploying to the real environment, without disturbing my host linux. I used to use virtualbox, but LXC is lighter in terms of resources usage, but only applicable to linux. 

To install lxc in an ubuntu machine:
$ sudo apt update && sudo apt install lxc -y

Once installed, you now have access to multiple lxc-* commands. 


If our ufw firewall is turned on, we need to allow traffic to and from the bridge, and also allow traffic forwarded to the bridge. The name of the bridge is usually lxcbr0
$ sudo ufw allow in on lxcbr0
$ sudo ufw route allow in on lxcbr0
$ sudo ufw route allow out on lxcbr0

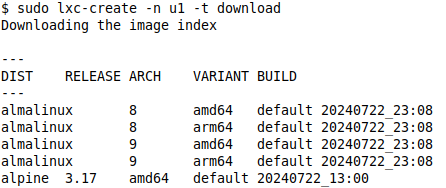
To create a container, use lxc-create command. For example, to create a container named as u1, using a template from https://images.linuxcontainers.org/, in an interactive mode (where you get to select distribution, release and architecture interactively), use below command
$ sudo lxc-create -n u1 -t download


To create a same almalinux container, named u2, using a template from https://images.linuxcontainers.org/ but in a non interactive mode, use below command
$ sudo lxc-create -n u2 -t download -- -d almalinux -r 8 -a amd64 


To list out all created containers, use below command 
$ sudo lxc-ls


To get a better listing, use fancy mode (-f)
$ sudo lxc-ls -f


To start the containers, just use lxc-start
$ sudo lxc-start u1
$ sudo lxc-start u2


After a while, the containers will get ip addresses


To access the shell of the containers, we use lxc-attach
$ sudo lxc-attach u1


To exit the shell, just type exit


To destroy the containers, we need to stop the container first.
$ sudo lxc-stop u1
$ sudo lxc-destroy u1


Wednesday, May 22, 2024

Multiple ways to extract zip files in linux terminal

I downloaded a big zip file (5.9GB) for an application, and as usual, to unzip it, just use unzip command.

$ unzip mybigfile.zip

I received this error, which is unusual.

Error when extracting using unzip command


Then I search around to find any other zip application that can extract the file. I am pretty confident that file is fine, since the provider has provided a md5sum file, and it matches. I ended up trying "jar" command. To install jar in ubuntu, simply run below command:
$ sudo apt update && sudo apt install fastjar -y

Once installed, extract the zip file using below command
$ jar xvf mybigfile.zip

Unfortunately, jar is also unable to extract the file, with below error:
Error when extracting using jar command


The I encounter another robust archiver called 7z, which can be installed in ubuntu using below command:
$ sudo apt update && sudo apt install 7zip -y

To extract a zip file, simply run this command:
$ 7z x mybigfile.zip

Even though 7z reported some error as well, but it managed to extract the file. 
Error when extracting using 7z command


There you go, 3 commands to extract a zip file. So do not worry if you are unable to extract any zip file, you can always try a few commands to get the job done.

Thursday, November 30, 2023

Draws ASCII Shapes Around Text in Linux Terminal

Boxes is an application to draw boxes and shapes around text in linux terminal. For those who cannot imagine, below is one example of how boxes is used:


To install boxes, simply run below command in any debian like linux distro:
$ sudo apt update && sudo apt install boxes -y

To use it, simply echo any text and pipe it to boxes
$ echo "this is linuxwave" | boxes

Boxes comes with 59 designs by default. We can list all the styles by typing:
$ boxes -l

To use the designs, simply append -d flag, and provide the name of the design. For example, to use unicornsay style:
$ echo "this is linuxwave" | boxes -d unicornsay

And you will get something like this


As usual, to know more about a command, simply use man command
$ man boxes

Monday, November 20, 2023

Install clustercontrol v2 on ubuntu 22.04 using podman

Clustercontrol is a database cluster management system, developed by severalnines.com, that ease up the work of database cluster deployment and management, using a nice web interface. Please follow below steps to install clustercontrol v2 using podman.

First, install podman
$ sudo apt update && sudo apt install podman -y

Configure podman registries. Add below lines into the end of /etc/containers/registries.conf
[registries.search]
registries = ['docker.io']

Pull the latest clustercontrol image
$ podman pull severalnines/clustercontrol

Create necessary directories
$ mkdir -p clustercontrol/{backups,cmon.d,cmonlib,datadir,prom-conf,prom-data,sshkey}

Create ssh key, and save them into clustercontrol/sshkey
$ ssh-keygen -t ed25519
Generating public/private ed25519 key pair.
Enter file in which to save the key (/home/myuser/.ssh/id_ed25519): /home/myuser/clustercontrol/sshkey/id_ed25519    
Enter passphrase (empty for no passphrase): 
Enter same passphrase again: 
...

Start clustercontrol
$ podman run -d --name clustercontrol \
-h clustercontrol \
-p 5000:80 \
-p 5001:443 \
-p 9443:9443 \
-p 19501:19501 \
-e DOCKER_HOST_ADDRESS=192.168.10.10 \
-v $PWD/clustercontrol/cmon.d:/etc/cmon.d \
-v $PWD/clustercontrol/datadir:/var/lib/mysql \
-v $PWD/clustercontrol/sshkey:/root/.ssh \
-v $PWD/clustercontrol/cmonlib:/var/lib/cmon \
-v $PWD/clustercontrol/backups:/root/backups \
-v $PWD/clustercontrol/prom-data:/var/lib/prometheus \
-v $PWD/clustercontrol/prom-conf:/etc/prometheus \
severalnines/clustercontrol

Create username, and set password for the user
$ podman exec -it clustercontrol bash
# s9s user --create --generate-key --controller="https://localhost:9501" --group=admins myuser
# s9s user --change-password --new-password=anypassword myuser

Open a web browser, and browse to the ip address of the server with port 5001 for https


Login using the user and password created above


Friday, November 10, 2023

Using psql without entering password

Sometimes, we need to run psql command without entering the password, even though the account is protected with password. The usual situations are, when we are running the psql command in a script, or we have to constantly monitor the output of psql commands using watch. Here is the method on how to achieve that.

Create a .pgpass file inside the user's home directory who's going to access psql without password

$ touch ~/.pgpass

Follow below format to add the user's details into pgpass

hostname:port:database:username:password

$ echo "10.10.10.10:5432:mydatabase:myuser:mysuperlongpassword" > ~/.pgpass

We can also use wildcard, such as *. If you password contains ":" or "\", use "\" to escape them

$ echo "*:*:mydatabase:myuser:mysuperlongpassword" > ~/.pgpass

Give a proper permission to the file, nobody accept the owner of the home directory is allowed to use the file
$ chmod 0600 ~/.pgpass
Now we should be able to use psql to mydatabase as myuser, without entering any password
$ psql -h localhost -U myuser mydatabase
postgres=# 

Saturday, November 4, 2023

Postgresql 16 streaming replication on ubuntu 22.04

Streaming Replication is a feature in PostgreSQL that allows continuous shipping and application of WAL XLOG records to standby servers to keep them current.

Below is the steps to configure streaming replication using postgresql 16 on ubuntu 22.04, with one master and one slave.

First, install postgresql in all nodes by referring here.


In master node, do below steps:

- add this configuration (uncomment wherever necessary) in /etc/postgresql/16/main/postgresql.conf. For one slave node, set max_wal_senders to 3, and add 2 for every additional slave nodes, according to percona.
listen_addresses = '*'
wal_level = replica
max_wal_senders = 3
 - create a user for replication
$ sudo su - postgres
postgres@master:~$ createuser --replication -P replicauser 
- allow replication from slave's ip address. Add below line in /etc/postgresql/16/main/pg_hba.conf, assuming our slave node's ip address is 172.17.0.4
host    replication     replicauser             172.17.0.4/32                 scram-sha-256
- Restart postgres
$ sudo systemctl restart postgresql


In slave node, do below steps:

- remove postgresql data directory which is /etc/postgresql/16/main (we can also rename it to save as a backup)

$ sudo su - postgres

postgres@slave:~$ rm -rf /etc/postgresql/16/main

- set a proper permission to the data directory

postgres@slave:~$ chmod 700 /etc/postgresql/16/main

- copy data from master (assuming master's ip address is 172.17.0.3)

postgres@slave:~$ pg_basebackup -h 172.17.0.3 -U replicauser -D /var/lib/postgresql/16/main/

- add standby.signal file inside postgresql data directory, to tell postgresql that this is a standby node

postgres@slave:~$ touch /var/lib/postgresql/16/main/standby.signal

- add below configuration (uncomment wherever necessary) /etc/postgresql/16/main/postgresql.conf

listen_addresses = '*'

hot_standby = on

primary_conninfo = 'host=172.17.0.3 port=5432 user=replicauser password=1' 

- restart postgresql

$ sudo systemctl restart postgresql


Verify the replication is working 

- in master, check pg_stat_replication table

$ sudo su - postgres

postgres=# select client_addr, state from pg_stat_replication where usename like 'replicauser';


- Check if walsender process is running in master

$ ps -ef | grep wal


- Check if walreceiver is running in slave

$ ps -ef | grep wal


- 


We can also create a database in master, and verify that the same database appear in slave almost instantly .

Wednesday, November 1, 2023

Postgresql 16 installation on ubuntu 22.04

Postgresql 16 is the latest postgresql version, released on Sept 2023. To install postgresql 16 on ubuntu 22.04, just follow below steps


First, create a postgresql repository file
$ sudo sh -c 'echo "deb https://apt.postgresql.org/pub/repos/apt $(lsb_release -cs)-pgdg main" > /etc/apt/sources.list.d/pgdg.list'

Then, import repository signing key
$ wget --quiet -O - https://www.postgresql.org/media/keys/ACCC4CF8.asc | sudo apt-key add -

Update the package list
$ sudo apt update

Install postgresql
$ sudo apt install postgresql-16 -y

Configure postgresql to listen on all interfaces rather than just localhost
- Edit /etc/postgresql/16/main/postgresql.conf
$ sudo vi /etc/postgresql/16/main/postgresql.conf
- Add below configuration
listen_addresses = '*'
- Save and exit

Start postgresql
$ sudo systemctl start postgresql

Enable postgresql on boot
$ sudo systemctl enable postgresql

Allow postgresql port (5432) on ufw
$ sudo ufw allow 5432/tcp

Access to postgresql database and check version
$ sudo su - postgres
postgres@host:~$ psql
postgres=# select version();

The output should look like below


Type \q to exit psql


Friday, September 29, 2023

View information about audio or video files in command line

One of the command to accomplish this, is called mediainfo. It is not installed by default, so we have to install it first.


To install mediainfo in ubuntu, simply run
$ sudo apt update && sudo apt install mediainfo -y

Once installed, we can check the information of any audio / video file using the command
$ mediainfo myfile.mp4

Some of the information that we can get from a video file


Some of the information that we can get from an audio file


Thursday, September 21, 2023

Extracting audio from video using ffmpeg

To extract audio from a video, here is the command

$ ffmpeg -i video.mp4 -q:a 0 -map a audio.mp4

whereby we supply the name of our video to using -i and put the name of the audio file at the end of the command.

If we want to extract only some part of the audio from the video, we can use below command
$ ffmpeg -i video.mp4 -ss 00:03:00 -t 00:00:45.0 -q:a 0 -map a audio.mp4

where -ss is the start time of the video, that we want to extract, and -t is the duration of how much time we want to extract from the -ss time. In the above example, the output will be an audio extract from a video called video.mp4, starting from the third minute, until 45 seconds after the third minute.  

Monday, September 18, 2023

Converting rpm into deb, tgz and vice versa using alien

To convert rpm to deb, or vice versa, we can use a tool called alien. To install alien in an ubuntu machine:
$ sudo apt install alien -y

To install alien in redhat based distro:
$ sudo dnf install alien -y

Once installed, we can easily convert any rpm into deb:
$ sudo alien --to-deb myapp.rpm

A file called myapp.deb will be created once alien finished doing its magic.

We can also use alien to convert deb to rpm:
$ sudo alien --to-rpm myapp.deb

A file called myapp.rpm will be created.

We can also convert to tgz package:
$ sudo alien --to-tgz myapp.deb

To generate multiple packages format:
$ sudo alien --to-rpm --to-deb myapp.tgz

Sunday, September 10, 2023

Determine if your system is using systemd

Systemd is a suite of basic building blocks for a Linux system that provides a system and service manager that runs as PID 1 and starts the rest of the system. It works as a replacement for sysvinit.

Almost all popular distros are using systemd, but if you need to use old version of the popular distros, or simply some non popular distros, here is how you can determine whether the linux your are having is using systemd, or not.

First, check which process is running PID 1.
$ ps 1

The output, most of the time will be /sbin/init. 


Now we need to determine if /sbin/init is a symlink to something else. There are 2 commands we can use to achieve that:
1. use stat
$ stat /sbin/init
2. use readlink
$ readlink /sbin/init

In a systemd based system, you will be getting output showing that /sbin/init is actually a symlink to /lib/systemd/systemd, where as in other system, you will not get that output.


Monday, September 4, 2023

Remove background from picture using command line

Removing a picture's background is sometimes a necessity, especially if you need the picture to integrate into other document or other picture. Here I will show how we can achieve that in linux using a python application called rembg.


First, make sure we have python installed. Most linux will have it installed by default, but just check to make sure
$ python -V


In order avoid installing python libraries globally, we will create a virtual environment to keep the rembg application files. You can read more about virtual environment, by clicking here. So we will create a virtual environment called rembg
$ python3 -m venv rembg

Activate the virtual environment
$ cd rembg
$ source bin/activate

Update pip
(rembg) $ pip install --upgrade pip

Install rembg[cli] package
(rembg) $ pip install rembg[cli]

Once installed, we can use "--help" to see what are the options available for rembg
$ rembg --help

Now we can use rembg to remove background. Let's say we have a picture called mypicture.jpg, and we want to remove its background, and save the new picture as mypicture-nobg.jpg:
(rembg) $ rembg i mypicture.jpg mypicture-nobg.jpg

Verify that the background has been removed in the new picture.

rembg also comes with http-server, for those who wanted a web interface to remove background from picture. Just run rembg with "s" flag to launch the rembg http server
$ rembg s

A web app will be launched on http://localhost:5000, where you can upload the file to be background removed, and click submit to get the output.


Simply press "ctrl + c" to cancel rembg's http server, when you are done.