Monday, November 14, 2022

Creating Partition Using cfdisk

Manipulating and partitioning hardisk can be a daunting task, especially for new sysadmin and if the disk has already contain data. Luckily, there is a tool that make this task easier, and that tool is called cfdisk.


First, we need to identify our disk name. This can be achieved by running lsblk
$ lsblk


Above is a sample output of lsblk. We can see that our disk name is sda (append /dev/ to the name for full path), and it has 130GB size. We can also see that only around 30GB has been used. We should have 100GB worth of free space for our new partition.

To start using cfdisk, just run it against the path of our disk, in this case /dev/sda
$ sudo cfdisk /dev/sda

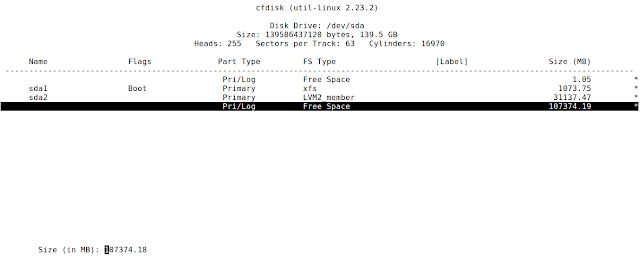
We should be able to see this interface


Move the cursor using the down arrow key on our keyboard, so that the cursor lies on the 107374.19MB line


Make sure your cursor is at "New" button, and press Enter.

Choose "Primary" and press Enter.


We want to use the whole free space, so just leave the size as it is, and press Enter.


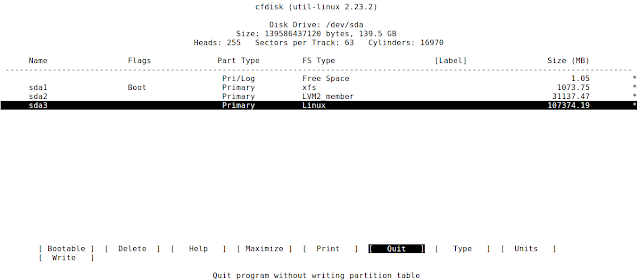
We now have a partition ready. To actually write the partition to the partition table, move your cursor using the right arrow key on the keyboard until it reached the "Write" button, and press Enter.


We will get  a warning message. Type "yes" and press Enter to confirm this action.


We will get this message once the partitioning is complete.


Quit cfdisk by choosing "Quit" and press Enter


Eventhough we have created the partition, but sometimes the partition table is not automatically updated. Run "partprobe" to inform the OS of the partition table change.
$ sudo partprobe


Use "lsblk" to see that the new partition has been created
$ lsblk


Tuesday, November 1, 2022

Extending LVM By Adding New Disk To a Virtual Machine

In previous post, we have covered the way to make LVM and filesystem aware of the disk size increase that happen in the virtual machine layer. 


There is another way to increase LVM volume capacity, that is to add new disk into the system. 

1. First, shutdown the virtual machine

2. Add a new virtual disk size into the virtual machine manager

3. Start the virtual machine

4. Check the new disk availability for LVM
$ sudo lvmdiskscan

5. To be able to use the new disk, it needs to be converted into physical volume (PV)
$ sudo pvcreate <path to the new disk>

6. Check list of PVs. Memorize the PV name
$ sudo pvs

7. Extend the volume group using the new PV
$ sudo vgextend <VG name> <PV name>

We can get the name of the VG by using this command. This command also will show how much free space is now available in the VG.
$ sudo vgs

8. Increase the size of logical volume, to use 100% of the free space available inside VG, using this command
$ sudo lvextend -l +100%FREE <LV PATH>

We can get the full  path of LV using this command
$ sudo lvdisplay | grep Path

9. Now, make the filesystem aware that the partition size has been increased. The command to do this differ from filesystem to filesystem, but we include 2 of the most used (based on our experience) filesystem
For xfs:
$ sudo xfs_growfs <mountpoint>

For  ext4:
$ sudo resize2fs <mountpoint>

10. Verify that the mountpoint is now increase in size
$ df -Th

Saturday, October 15, 2022

Extending Virtual Disk in a Linux Virtual Machine Using LVM

To increase a disk size in a virtual machine with Linux operating system configured with LVM, below are the steps (these steps were tested using virtualbox):


1. Power off the virtual machine

2. Increase the virtual disk size in the virtual machine using the virtual machine manager

3. Restart the virtual machine

4. Even though the virtual disk has been increased in size, but LVM is not aware of the change. To make LVM aware of the change, run pvresize command
$ sudo pvresize <pv name>

You can get the physical volume (PV) name by running "pvs" command
$ sudo pvs

5. Once the physical volume (PV) has been resized, run "vgs" to see the new volume group (VG) size
$ sudo vgs

6. Resize logical volume (LV) to make the new size available for us to use. Use below command to resize LV to use 100% of the free space available in VG
$ sudo lvextend -l +100%FREE <LV path>

You can get the LV path by running lvdisplay
$ sudo lvdisplay | grep Path

7. Now the partition is aware of the size change, but not the filesystem. Check the filesystem type and mountpoint using below command
$ df -Th

8. Depending on the filesystem type, extend your filesystem to suit the new partition size. 
For xfs:
$ sudo xfs_growfs <mountpoint>

and for ext4:
$ sudo resize2fs <mountpoint>

9. Verify that your filesystem is now using the new size
$ df -Th

Saturday, October 1, 2022

Splitting video using linux command line

To easily split (or cut some part) of video using command line, a tool called ffmpeg can be used.


Why use command line? Lighter on resource. Video editing is a high resource activity, and by using command line, we can reduce the resource used on our machine while doing video splitting, especially if we are using low resources machine. 

To install ffmpeg, on an debian based machine, just run below command
$ sudo apt -y install ffmpeg

To do the splitting, just use below command
$ ffmpeg -i mymovie.mp4 -ss 00:01:00 -t 00:00:30 myeditedmovie.mp4

where
-i is for which video to edit
-ss is for where in the video that you want to start
-t is for the duration of the output video

So in the above example, you will get an output called myeditedmovie.mp4, which start from the first minute of the original video, and will last 30 seconds.

Thursday, September 1, 2022

Testing SSL Certs Using Apache on Docker

Sometimes we have a need to test our SSL, before we deploy it to production. If we have a development or staging environment, then we can test it there. But if we do not have that, we can always rely on trusty old docker to test the ssl in our own machine. Please follow along to learn how to do it.


Pre-requisite:
- have docker installed 

1. Put our ssl cert, intermediate cert (if we have one) and key into our current directory. Rename them as server.crt, server.key and server-ca.crt

2. Prepare a configuration file like below inside our current directory, and save it as https.conf
Listen 443
<VirtualHost _default_:443>
  DocumentRoot "/usr/local/apache2/htdocs"
  ServerName linuxwave.info
  ServerAdmin me@linuxwave.info
  ErrorLog /proc/self/fd/2
  TransferLog /proc/self/fd/1
  SSLEngine on
  SSLCertificateFile "/ssl/server.crt"
  SSLCertificateKeyFile "/ssl/server.key"
  SSLCertificateChainFile "/ssl/server-ca.crt"
</VirtualHost>
3. Run a container based on the httpd image from dockerhub, and mount the current folder with our ssl key and certs into /ssl in the container
docker run -dit --name apache -v ${PWD}:/ssl httpd
4. Copy /usr/local/apache2/conf into /ssl, so that we can edit it inside our host machine
docker exec -it apache cp /usr/local/apache2/conf/httpd.conf /ssl
5. Enable ssl in apache config by adding these lines into httpd.conf. We can just edit the file in our host machine, since text editor is not installed by default inside the apache image. The first 2 lines are to enable ssl support for apache, and the last line is for apache to include any files that end with .conf into its configuration
LoadModule ssl_module modules/mod_ssl.so
LoadModule socache_shmcb_module modules/mod_socache_shmcb.so
Include conf/extra/https.conf
6. Copy the edited httpd.conf file back into its original location
docker exec -it apache cp /ssl/httpd/conf /usr/local/apache2/conf
7. Create a symlink from /ssl/https.conf into /usr/local/apache2/conf/extra/
docker exec -it apache ln -s /ssl/https.conf /usr/local/apache2/conf/extra
8. Test the configuration file
docker exec -it apache httpd -t
9. If no error was found from the above command, restart the container
docker restart apache
10. Open a new terminal, and get the ip address of the container
docker inspect apache | grep IPAddress
11. Put the ip address and your hostname inside your machine's /etc/hosts
echo "172.17.0.2 linuxwave.info" | sudo tee -a /etc/hosts 

12. Try to access the above domain using a web browser, and check the ssl cert information


13. If the ssl certs are working fine inside docker, you can be sure that it will work just fine in your production server